Posts

Building a Workbench - My DIY Project

Image
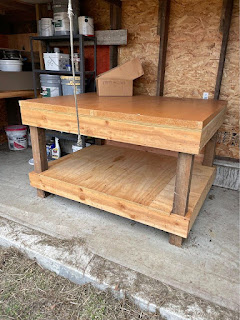
As a DIY enthusiast, having a dedicated workbench in my workshop was a must. I wanted a sturdy and functional workbench that would allow me to work on my projects comfortably. I searched online for some DIY workbench plans and came across two great resources: Zammyfall and Jann Furniture blogs. The Importance of a Good Workbench A good workbench is essential for any DIY enthusiast. It provides a solid and stable surface to work on, as well as storage space for tools and supplies. A well-designed workbench can improve efficiency and productivity by keeping everything organized and within reach. Choosing the Right Plans After looking at various workbench plans, I decided to use plans from both Zammyfall and Jann Furniture blogs. Both plans were detailed and easy to follow, with step-by-step instructions and detailed illustrations. The plans also included a list of materials needed, which made it easy to gather everything I needed before I started building. Building My Workbench

How I Built My Own Bat House

Image
One summer evening, as I was sitting on my porch, I noticed a few bats flying around my property. At first, I was a little scared, but then I remembered how beneficial bats are to the environment. They eat tons of insects every night, including mosquitoes, which is always a plus. That's when I decided that I wanted to build a bat house on my property. The Benefits of Bat Houses Bat houses provide a safe and secure place for bats to roost during the day. They also help to control insect populations, which is great for the environment and for humans. By building a bat house on my property, I was not only providing a habitat for these beneficial creatures, but also doing my part to help the environment. Building My Bat House I searched online for some plans and came across the Woodworking blog . They had a great step-by-step guide for building a 3-chamber bat house that looked easy enough to follow. I gathered all of the materials and got started. The instructions were clear an

Creating Your Own DIY Jewelry Box: A Woodworking Project Guide

Image
If you're looking for a fun and creative woodworking project, building your own DIY jewelry box can be a great choice. Not only will you have the satisfaction of creating something beautiful and functional, but you'll also have a unique piece that you can use or give as a gift. Materials Needed Before you get started, you'll need to gather the necessary materials. Here are the items you'll need: Wooden boards Wood glue Screws or nails Hinges Knobs or handles Sandpaper Stain or paint Step-by-Step Guide Once you have your materials ready, it's time to get started on the DIY jewelry box project. Here's a step-by-step guide: Step 1: Measure and Cut Your Wood Using a measuring tape and saw, carefully measure and cut the wooden boards to the desired sizes for your jewelry box. Make sure to double-check your measurements before cutting to ensure everything fits together properly. Step 2: Assemble the Box Apply wood glue to the edges of

DIY Adirondack Rocking Chair - a Relaxation and Craftsmanship

Image
There's something special about a rocking chair. It's a piece of furniture that has the power to transport you to a state of relaxation and tranquility. And when that rocking chair is an Adirondack rocking chair that you've built with your own two hands, that feeling is even more special. As a DIY enthusiast, I had always wanted to try my hand at building an Adirondack rocking chair. I had seen them in photos and on websites, and I knew that they were the perfect combination of style and comfort. So, I decided to take the plunge and build my own Adirondack rocking chair from scratch. Researching the Perfect Design The first step in building any piece of furniture is to find the perfect design. I spent hours scouring the internet for plans and ideas, looking for the perfect Adirondack rocking chair design. I wanted something that was both comfortable and stylish, with a classic Adirondack look. Finally, I stumbled upon a great design on the Anything Yes blog. The plans

Creative Ways to Use Your DIY Pergola

Image
Are you looking for a way to enhance your outdoor living space? A DIY pergola could be just the solution you're looking for. Not only does a pergola add beauty to your backyard, but it also provides shade and a place to relax and entertain guests. Building a pergola may seem like a daunting task, but with the right tools and instructions, it's a project that you can tackle on your own. You'll need some basic woodworking skills and a weekend or two to complete the project. One great resource for DIY pergola plans and instructions is My Wooden Project . Their blog is full of helpful tips and tricks for woodworking projects, and they have several different pergola designs to choose from. Step-by-Step Guide to Building a DIY Pergola Choose the location for your pergola and mark the corners with stakes and string. Dig post holes at each corner and pour in concrete to secure the posts. Cut the posts and crossbeams to the desired length and shape. Install the crossbeams